
✅ Setting up your Profile
✅ Add Employee/User
✅ Create/Upload New Contacts
✅ Integrate your Google account
✅ Integrate your Business’s Facebook and Instagram Pages
✅ Setting up Stripe or PayPal Accounts
✅ Integrate Microsoft Outlook Account
✅ How to purchase a phone number for your account
✅ Setup Email Services
✅ Connecting Domains
Setting up your Profile
Your Profile
Here’s an overview of your account profile. Some of this is basic information, yet it’s critical so you can have a good foundation and be set up for success with using the system.
Personal Information
Upload your profile photo and change your personal contact information.

Change/Update Password
You can change or update your account password here.

User Availability
Set your personal availability and set a meeting location for your calendar invites.
(See “calendars” for a guide on how to set up calendars)

Email Signature
Set a custom email signature for emails your user account sends when contacting leads and customers from within the CRM.

Integrations
Where you will see and control some specific integrations like Zoom.
(For more integrations, see the “integrations” tab in this settings area)

Calendar Configuration
Control calendar conflicts and which calendar you want to be the “Primary” calendar for scheduling.
(You will need to integrate your Google account to control calendars in this section. See “integrations” to set up your Google accounts)

Add Employee/User
NOTE: Depending on your user permissions, you may not have access to all of the components.
Add New Users
Click here to add new team members.

Edit User Information
You can add a personal logo for each user too. For each employee, fill out their basic information: Name, email, and phone number. You can also add phone extensions here.
-
- You can set and reset passwords for each user here too.
-
- You can establish an email signature for each user, which can be helpful for the campaigns they are assigned to.
-
- You can also assign a specific calendar to the user.

Edit User Permissions
If you are the administrator, you can toggle on and off the various permissions for the users within your team.

Edit User Roles
You can assign the user to be a general user or an admin.

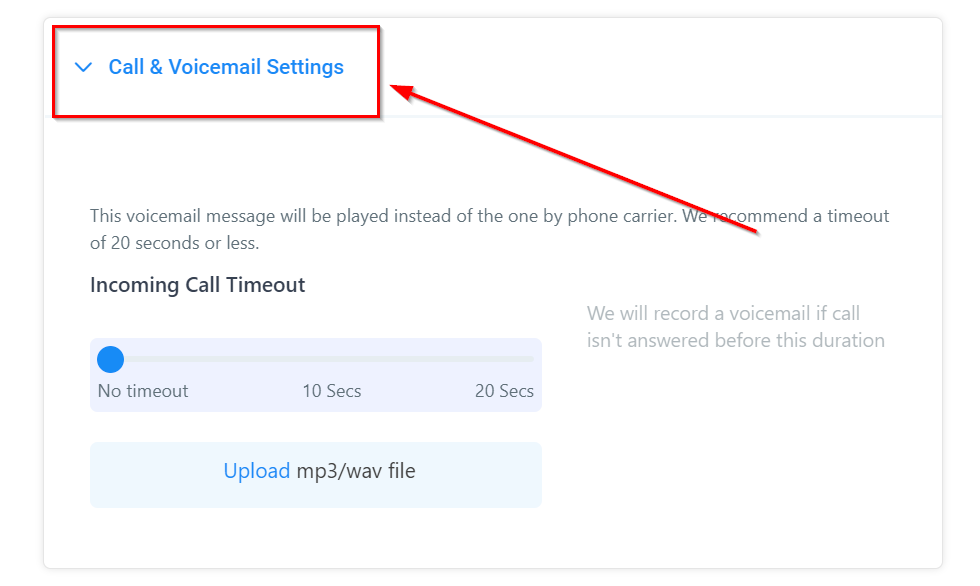
Edit Call & Voicemail Settings
Here you can include an inbound Twilio number here if the user requires a dedicated number. You can also set the call time-out and upload a voicemail recording file.
Edit User Availability
User availability lets you set up the default availability for each user.

Edit Calendar Configurations
User Calendar Configuration allows you to connect a Google calendar for a user. If they want to sync their calendar in the system with a Google calendar.

Click here to learn more about adding users and employees to your account ➡️
✅ Create/Upload New Contacts
Although your CRM will automatically add contacts into your system whenever there is a text, call, Facebook message, or email communication created, you can manually add a new contact into your CRM with this button.When you click on the button, it directs you to the information page where you can input the contact details.
 ****
****
Creating New Contacts

-
- Personal Logo: Here you can upload the business logo of each contact as a way to identify them especially if you have clients bearing the same name. The proposed size is 512*512px and not bigger than 2.5mb.
-
- First and Last Name: Type in the Contact’s First and last name in these spaces provided.
-
- Email: Type in the contact’s email address here**.**
-
- Phone: Type in the contact’s Phone number here**.**
-
- Contact Type: You either move the contact to the Lead type or the Customer type.
-
- Time Zone: Choose the timezone your contact is in. This will help you or any of your users know the best time to contact them.
- DND All Channel or some Channels: You can enable the Do Not Disturb notification here for all the social channels or some of the channels of the contact.
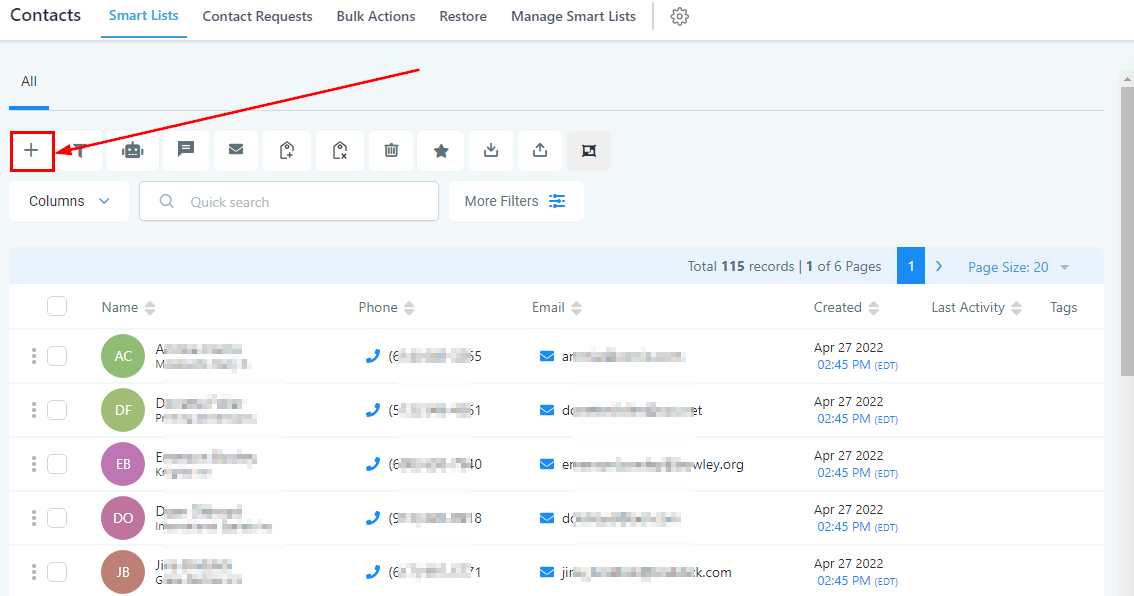
Uploading Contact Lists
If you need to import a single contact or a group of contacts from a different CRM or marketing campaign, you can upload your spreadsheet by selecting this button.
![]()
Importing Contacts
Your spreadsheet will need to have column headers that match the fields in this CRM.
Steps for Importing Contacts

There are three (3) steps you take when importing contacts to your CRM; Upload, Map, and Details.
Upload
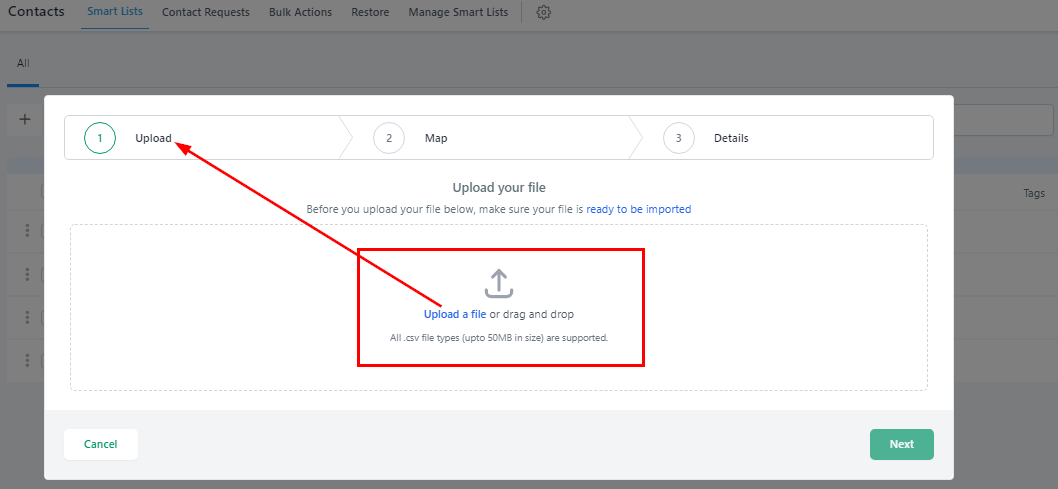
The first step is uploading the contacts from your device but before you upload the contact, make sure your file is ready to be imported;
All files being imported into the system must:
-
- Be a .csv file
-
- Have only one spreadsheet
-
- Be smaller than 50MB (tip: a typical .csv file with 4 columns and 10,000 records will be ~500kb in size)
-
- Include a header row in which at least one column header corresponds to a field in the system (i.e the First and last name, Phone number, Email et.c.) for;
-
- Uploading ONLY New Records in the system
-
- Choose ‘Add New Records’ in Step 3 of the Import Flow
-
- Uploading ONLY New Records in the system
-
- Updating ONLY Existing Records in the system
-
- Choose ‘Update Contact Records’ in Step 3 of the Import Flow. Or,
-
- Updating ONLY Existing Records in the system
-
- Both
-
- Choose ‘Both’ in Step 3 of the Import Flow
-
- Both
-
- Include a header row in which at least one column header corresponds to a field in the system (i.e the First and last name, Phone number, Email et.c.) for;
Map

Here you can match your column from your imported file with the corresponding contact field in the system. You can also preview your matched information in the preview column.
NOTE: If you have an unmatched column(s), you have to tick the “Don’t import data in unmatched column” box in other to be able to move to the next step. You won’t be able to move to the next step without ticking on it.

Details
This is the last step for importing contacts.
Import Name
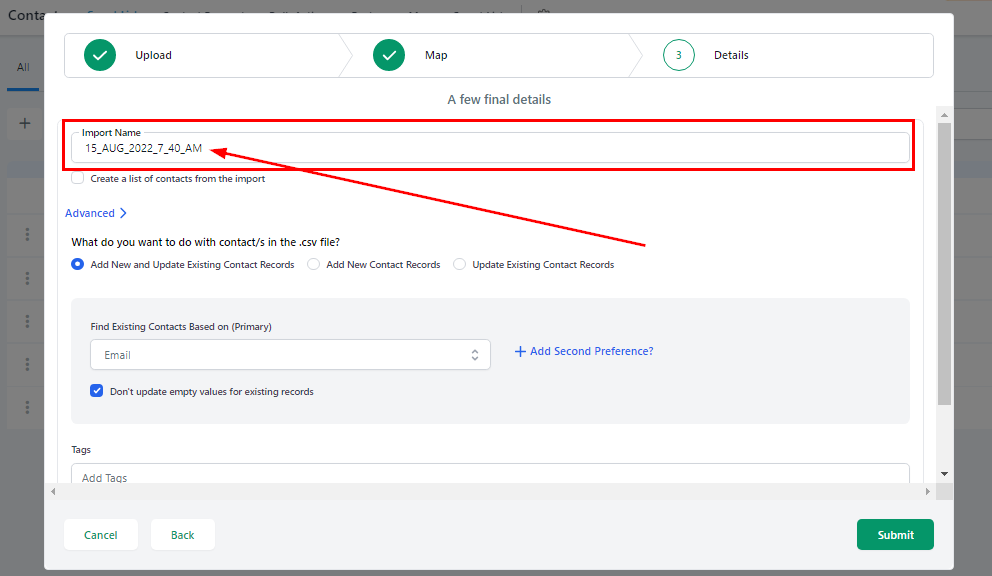
You can edit the import name
You can also create a new contact list with your import by ticking this box.

Advanced
In the Advanced Settings, you can decide what you want to do with the contact in the .CSV file, you can either;
Add New and Update Existing Contact Records

Here you can decide to add the new contacts to a new list and also update the existing contact list in your CRM with these new contacts. Or
Add New Contact Records

You can also add the contacts to a new list only. Or
Update Existing Contact Records

You can only merge the new contacts with the existing contacts.
Find Existing Contacts Based on (Primary)

You can also decide to skip existing contacts based on the phone (Primary) when you merge or update your contact list or don’t skip.
You can tick the box to not update empty values for existing records.
✅ Integrate your Google account
Learn how to set up a Google account in your CRM!
Sign in to Google
Click on the sign-in tab to connect your Google account. Enter your username and password and you will be redirected to the CRM.

Click here to learn more about Google Account Integration.
✅ Integrate your Business Facebook and Instagram Pages
Connect tab lets you connect your Facebook and Instagram to your CRM. When you have already connected your social account, this tab will let you deselect that social account from your CRM. If you see either FB or IG or both icons in a gray color that means it is not connected to your CRM as yet. Once you click on connect tab, it will guide you with further steps.

Facebook login page
-
- Enter your Facebook username.
-
- Enter your Facebook password.
-
- Click on the login option for the next steps.

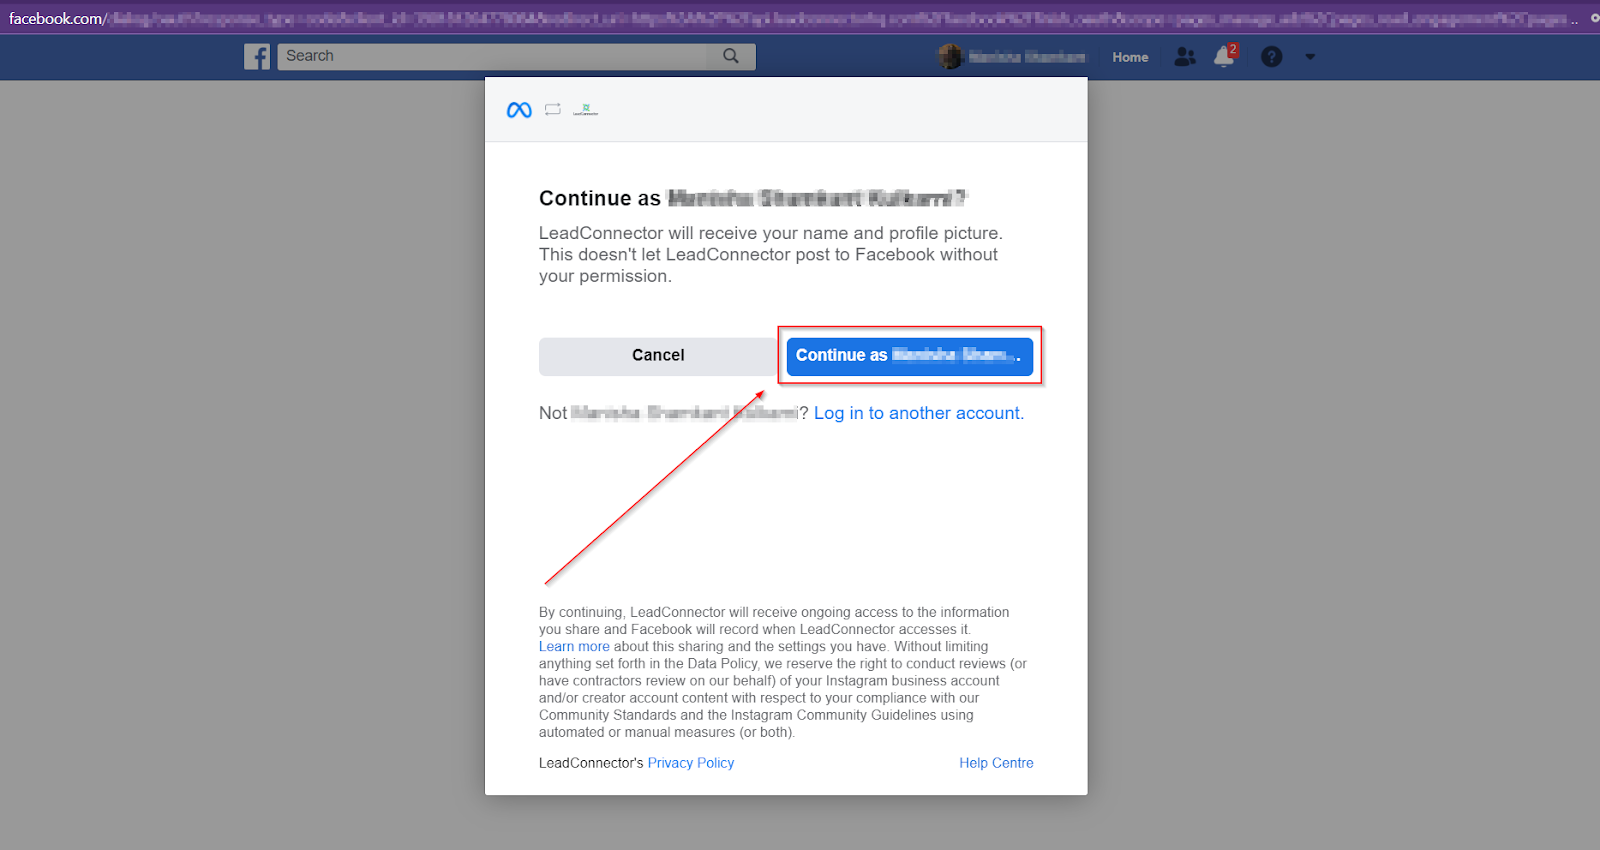
Confirm your Facebook account.
This page will help you ensure you are logging in to the same Facebook account that you are trying to access from your CRM. This helps when you are automatically landing on this page because you were already logged in to some other Facebook account on your browser. Once you continue with the account, you will be shown an Instagram account linked to that particular Facebook account.
Choosing Instagram Business Account
On this page, you will be shown a list of Instagram business accounts that are connected to the Facebook pages you manage. You can select or deselect the page or pages from this list. Once you have made the selection, click on the “Next” tab.

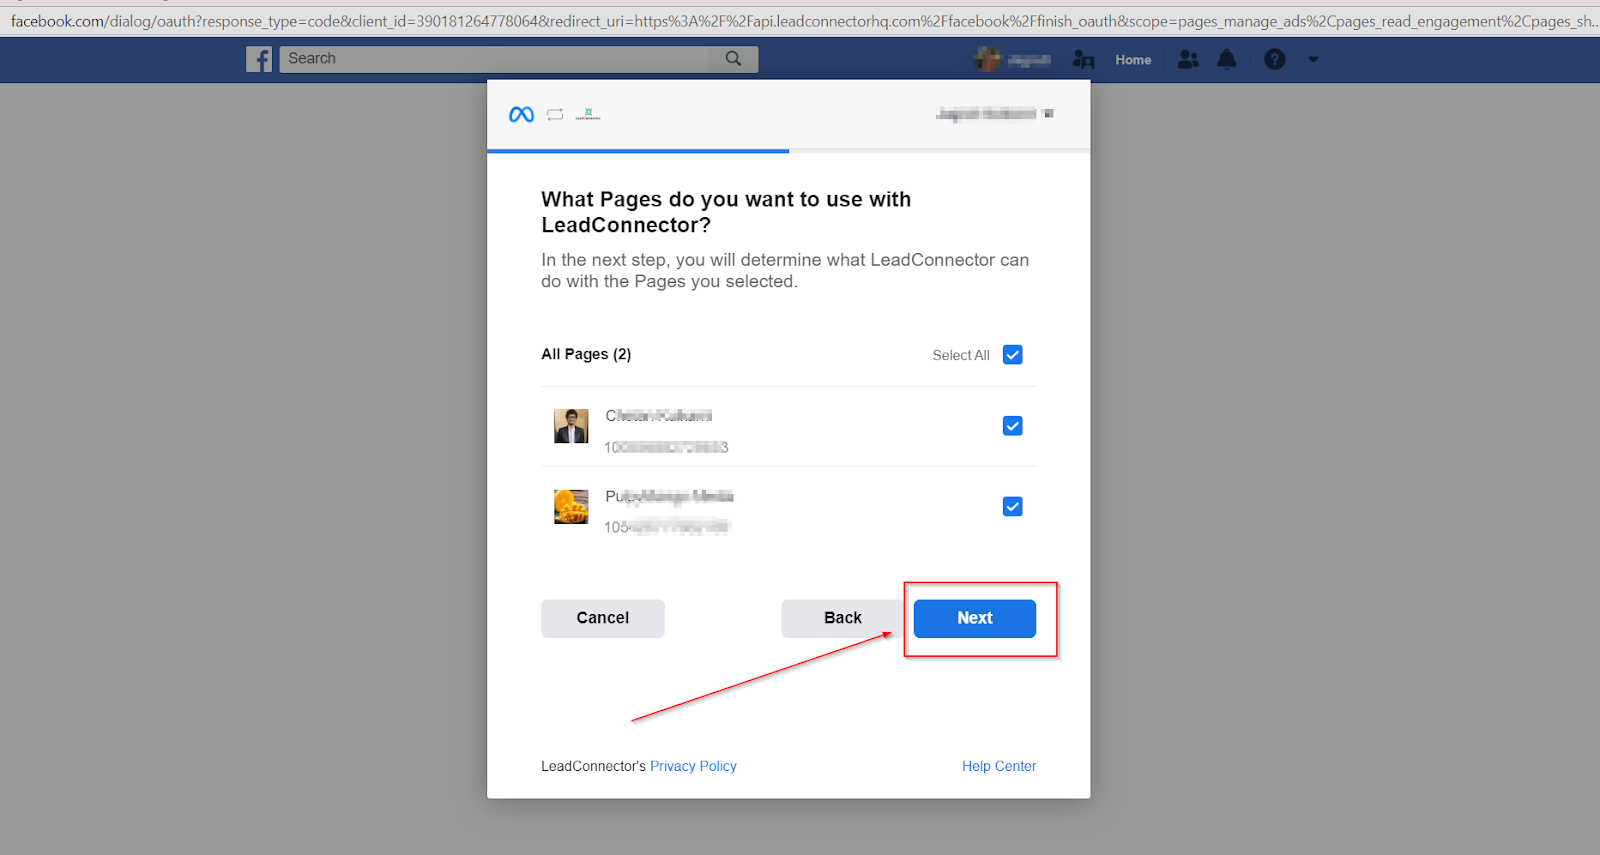
Choosing Facebook page/pages
On this page, you will see the list of Facebook pages that you have access to, you can select and deselect the page depending on which page you would like to lin to the particular CRM location. Once you have made the selection, simply click on “Next” tab to move to the next page.
Permissions for Leadconnector
1. Manage your ad accounts.
2. Access to you your Facebook ad stats.
3. Accessing Instagram posts
4. Accessing message conversations.
5. Managing leads for the pages

Permissions for Leadconnector
6. Permission to Access your Instagram messages.
7. Permission to Create content for the page.
8. Permission to manage comments received to the posts published on your page
9. Permission to read the content posted on the page.
10. Creating and managing ads.
11. Managing account settings and webhooks.
12. Access to the user content of the page.
13. Show the list of pages you manage.
Clicking on the “Done” tab will finish the selection process.
(Tip – Keep all the toggle options turned on)

Confirmation
Once you have completed all of the steps, the system will display a confirmation message as shown in the screenshot below. Click on the ok tab for the next page to appear.

Connecting Facebook Page
Here you will see the list of Facebook pages associated with the Facebook account you just Linked to your CRM location. This is helpful to access a specific page from the relevant CRM location.
-
- Click on the dropdown menu to see the list of pages associated with your account.
-
- Select the page that you wish to connect to your CRM location.

Connecting Facebook and Instagram
Once you have selected the Facebook page from the list of the pages, the system, will detect the Instagram business account associated with the Facebook page. Click on the “Connect Facebook and Instagram” tab to confirm your selection.

Facebook & Instagram Integration (After getting connected to CRM)
-
- Notice that the Facebook and Instagram symbols are no longer gray. This means you have successfully connected your Facebook and Instagram to your CRM.
-
- By clicking on the “Connected” tab, you can delete the existing Facebook and Instagram accounts whenever needed.

✅ Setting up Stripe or PayPal Accounts
Stripe Integration
If you currently accept payments using Stripe, you will be able to connect your account here.
You can also see whether “live” mode and “test” mode are enabled.

Stripe Live Mode
Use “live” mode when you’re ready to start accepting real transactions from customers.
Stripe Test Mode
Use “test” mode when testing new products so you don’t charge yourself by accident.
Connect or Disconnect Stripe
If you do not already have Stripe connected, you can use this button to set it up.
If you are already connected and would like to disconnect your account, you can also use this button to disconnect your account.
PayPal Integration
If you currently accept payments using PayPal, you will be able to connect your PayPal account here.
You can easily switch from “sandbox” mode to “live” mode with the click of a button.

Live Mode
Use “live” mode when you’re ready to start accepting real transactions from customers.
Live Client ID
Enter your PayPal client ID here. If you are unfamiliar with where to find your client ID, you can do a quick Google search or ask your CRM administrator.
Live Secret ID
Enter your PayPal secret ID here. If you are unfamiliar with where to find your secret ID, you can do a quick Google search or ask your CRM administrator.
Save Your Info
After you have added your information, make sure to save it before moving forward!
Sandbox Mode
Use “sandbox” mode when testing new products so you don’t charge yourself by accident.
✅ Integrate Microsoft Outlook Account
Connecting Outlook
Scroll down to the Outlook calendar tab in the profile section of your CRM to link your outlook account to your CRM location. Click on the “Connect” tab to proceed ahead.

Sign in to your Microsoft account
Sign in to your Microsoft account with your login credentials, and allow Leadconnector to access your Microsoft account information.

Logged-in users should be part of the location, only in that case can you find the Profile in the Settings menu.
Click here to learn more about Microsoft Outlook Account Integration.
✅ How to purchase a phone number for your account
Adding New Phone Numbers
Lets you add a new phone number for your CRM location. Click the + Add Number button to begin adding new numbers to your account.

Selecting Phone Number
Clicking on + Add Number tab will open up a page where you will be prompted to take some actions.
1. Select the country.
2.Select the area code
3. Hit “search” tab
4. Choose the number of your choice
5. Hit “Save” button.

Make sure to check with your administrator before you purchase. If you already have a phone number in your account, you do not need to purchase a new one!
✅ Setup Email Services
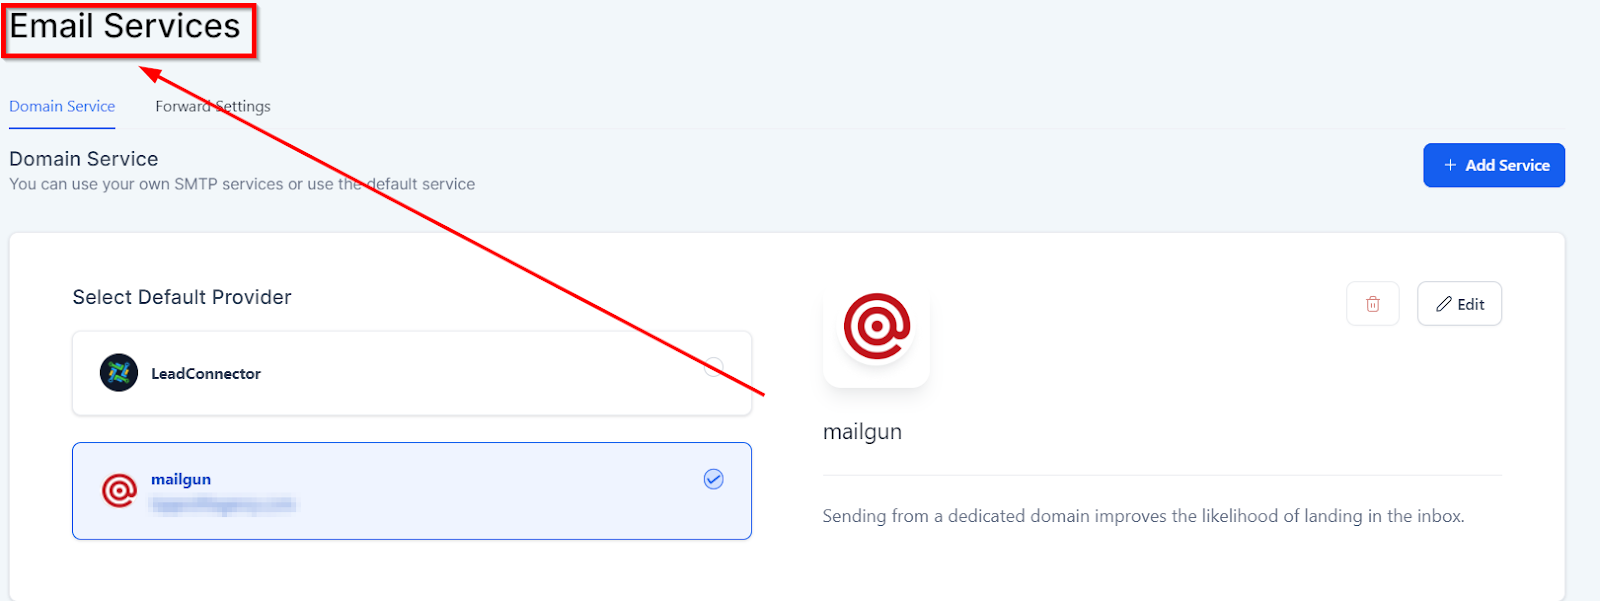
Default provider
Let’s you select the default email service provider in case if you have multiple email providers connected to SMTP.

All new accounts will, by default, use Lead connector – Email, but a third-party SMTP provider can be integrated anytime.
Edit Tab
This tab lets you edit the selected email service provider. We will cover the editing in the next article.

Editing email service
Here you can configure your SMTP provider such as Sendinblue, Gsuite or Microsoft Outlook.
SMTP Provider – Click on the dropdown menu to select the SMTP provider.
API Key – Get the API key from your SMTP account. Every smtp provide has the unique API key. for example, you can get the API key for gsuite by logging in to your google admin console. depending on the smtp provider you have selected, you will need to get the unique API key from the respective account.
Domain – From the dropdown menu, you can select the domain which you would like to configue for email services.

Delete provider
Depending on CRM user permissions, This option will allow you to delete an email service provider.

Add an email service
This tab will let you add a new email service provider for your CRM location.

Selecting an email service provider
You can choose which email service provider from the list. you can also add a service provider outside of these options.

Setting up Gmail
-
- Select Gmail option 2
-
- Enter your email address.
-
- Enter your password.
-
- Click on the “Save” tab.

Add your own email service
There are multiple SMTP service providers which you can configure with your CRM. Just click on the “Other” tab to set up an SMTP that’s outside of the list.
1. Click on the “other” tab to add the provider outside of the list.
2. Enter the name of the provider. eg. Sendinblue.
3. Copy and paste the SMTP server details from the SMTP provider you have chosen. (you will have to log in to your SMTP provider’s website and click on the SMTP option to get these details.)
4. Copy and paste the SMTP port number from the SMTP provider you have chosen. (you will have to log in to your SMTP provider’s website and click on the SMTP option to get the details.)
5. Enter the username.
6. Enter your email address.
7. Enter Password.
8. Click on “Save” tab.

✅ Connecting Domains
Connecting Domains
In this section, you can connect your website domains to your CRM which will give you the ability to build and manage your website directly inside your CRM!
We strongly advise that you speak to your CRM administrator or a web developer before performing these actions.
NOTE: Depending on your user permissions, you may not have access to all of the components.
Add New Domain
To add a new domain to your CRM, click this button.

Adding Your Domain
You can ONLY add an already purchased domain to your CRM. If you have not yet purchased a domain, you will need to go purchase one from your web hosting service.

Enter Domain Here
Once you have your domain, you can add it here.
Adding DNS Records
INCREDIBLY IMPORTANT!
You will need to log into your web hosting service and change your DNS records to match what you see here.

Robots.txt
This is not required, but if you have robots.txt code that you want to add to this domain, you can do so here.
Robots.txt is a text file webmasters create to instruct web robots (typically search engine robots) how to crawl pages on their website.

Save and Apply Changes
Make sure to select the “Add” button when you are finished.
Adding a domain may take some time, and this button may not work right away. Your DNS records will need to propagate and that can take up to 24 hours.

If you have never changed or added DNS records, contact your CRM admin or a web developer to do this for you.